Your Cart is Empty
#1 Cake Delivery Service In Malaysia
#1 Cake Delivery Service In Malaysia
-
 Cakes made with love
 -
 4.8/5.0 Based On 6,913 Reviews
 -
 +60 111 700 0689 (Mon-Sun, 9am-6pm)

#1 Cake Delivery Service In Malaysia
#1 Cake Delivery Service In Malaysia

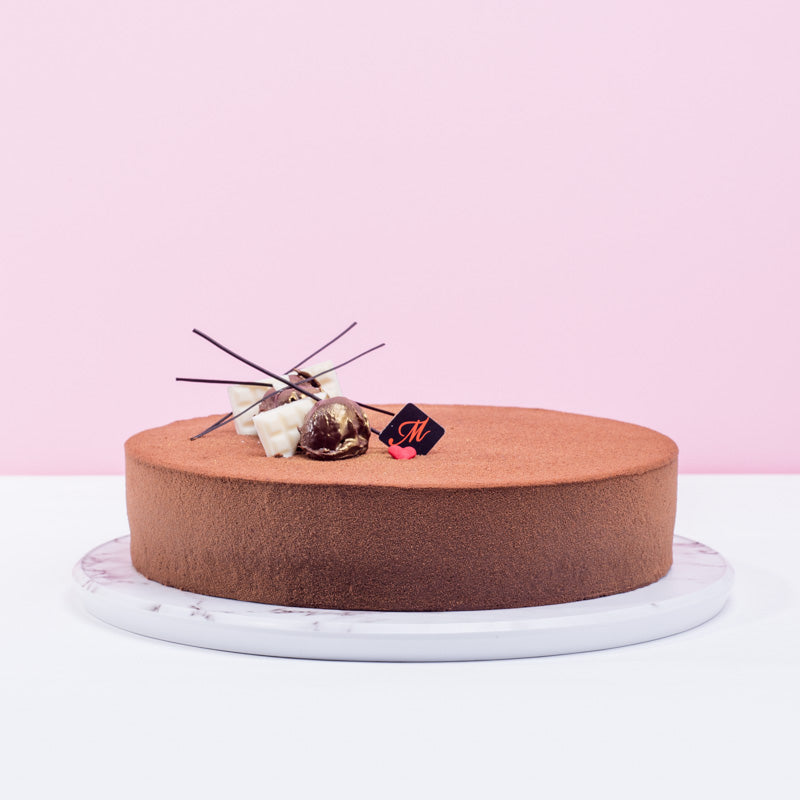
This sinfully delicious Devil's Food Cake is sure to be a hit with chocolate lovers. Devil's food cake is a classic American dessert. As the darkest of the chocolate cakes, it is undeniably the most chocolatey. It's the perfect combination of cake and fudgy goodness. With its rich chocolate flavour and chocolate buttercream icing, this cake is perfect for any celebration. This cake gets a double dose of chocolate from the fudgy chocolate icing that we use to fill it and frost it. Mmmm!
The origin of the name Devil's Food Cake is a mystery, however, some have speculated that it was so named because it tastes too sinful to eat. Some say it's because it's dense and chocolatey, the antithesis of fluffy white Angel Food Cake.

Preparation time: 2 hr 15 min
Cooking time: 1 hr 45 min
Servings: 8 to 10 servings
Diet: Low in salt
Cuisine: Dessert
Category: Confectionery
This devil's food cake is for you if you like chocolate cake but long for something more dense, moist, and delicious. Each bite is so light and airy that it dissolves in your mouth. The cake is great since it is dense but tender. No party, whether it's a huge birthday bash or an intimate Valentine's Day dinner, is complete without a layer cake. There's nothing quite like the anticipation leading up to the unveiling of a chocolate cake mountain. This is an old-fashioned cake recipe that never fails to please. This easy chocolate snack requires only a few basic ingredients and very little time to prepare!
per 1 slice
Calories
311 kcal
Protein
4 g
Carbohydrates
39 g
Fat
18 g
Saturated Fat
11 g
Fibre
2 g
Sodium
183 mg

A Sinful Fact!
The word deviled referred to a dish that was black, rich, spicy, or chocolaty in the 18th century. This decadent chocolate cake was so rich that it was practically considered sinful, hence the name Devil's Food.
Extra baking soda (sodium bicarbonate) is occasionally used to give devil's food cake a deeper and darker mahogany hue, setting it apart from standard chocolate cakes. Compared to other chocolate cakes, devil's food cake calls for fewer eggs, less sugar, and butter (or a butter substitute).

The unsweetened cocoa powder gives this cake its strong chocolate fudgy flavour. Raw, unsweetened cocoa powder or cocoa powder that has undergone the Dutch process can both be used (alkalized). Remember that the flavour and appearance of your chocolate cake will change depending on the type and brand of unsweetened cocoa powder you use.
We dissolve the cocoa powder in either very hot coffee or boiling water to bring out its full flavour, then add it to the cake mix. The combination of butter and oil in this cake makes it one of a kind. A cake made with oil in addition to butter will retain its tender texture even after being chilled. Light olive oil, canola oil, corn oil, safflower oil, and vegetable oil are all good options.
For the frosting, put the chocolate in a large bowl that can take heat. Bring the cream to a boil in a small saucepan. Pour the cream over the chocolate and gently move the bowl so the cream can settle. Set the mixture aside for about 4 minutes, or until it has softened. Mix until it's smooth. Cover the frosting's surface with plastic wrap. Set aside and let sit for about 2 hours at room temperature.
To make the cake Put a rack in the middle of the oven and heat it to 350 degrees. Lightly butter two 9-inch round cake pans and put a circle of parchment or wax paper on the bottom of each one.
In a medium mixing bowl, combine the flour, baking soda, baking powder, and salt. Place aside.
In a stand mixer with a paddle attachment, beat the butter on medium speed for about 2 minutes, or until it is smooth. Turn the speed up to medium-high and add the sugar slowly. Keep beating for about 4 minutes, or until the mixture is light and smooth. Stop the mixer and use a rubber spatula to clean the sides of the bowl. Add the cocoa powder and vanilla, and beat for another minute at medium speed. (If you need to, stop the machine and scrape the sides of the bowl again.) With the mixer on medium-low speed, add the eggs one at a time, beating for 1 minute after each addition. Scrape down the bowl's sides.
In a saucepan, combine the water and milk and bring to a boil. Take the pan off the heat.
With the mixer on low, add about 1/4 cup of the flour mixture at a time. Pour the hot liquid slowly and carefully into the batter. Take the bowl off the mixer and finish mixing the batter with a large rubber spatula until it is smooth. Split the batter evenly between the pans that have been ready. Drop each pan gently on the counter to get the batter to settle.
Put the pans in the oven on the middle rack. About 30 to 35 minutes, or until the cakes start to pull away from the sides of the pans and the centre springs back when lightly touched.
Let the cakes cool for 10 minutes in their pans on a rack. Turn the cake layers out of the pans and let them cool on the rack.
The Devil’s Tip
Cake layers can be stored in plastic wrap for up to a day at room temperature or frozen for up to two months before assembly.
Put together the Devil's Food Cake. Place 1 upside-down cake layer on a cake stand or flat platter. Scoop roughly a third of the frosting onto the layer's centre. Spread the icing evenly over the layer to the borders with a big, offset spatula. Place the second cake layer on top, rounded side up. Spread half of the remaining icing evenly over the top, allowing any excess to run down the sides. Cover the sides of the cake with the remaining frosting. Make a swirling design in the icing with the offset spatula tip.
It's that easy! Now you can start devouring your work of art and even share with your friends and family to taste what the Devil eats.
Comments will be approved before showing up.


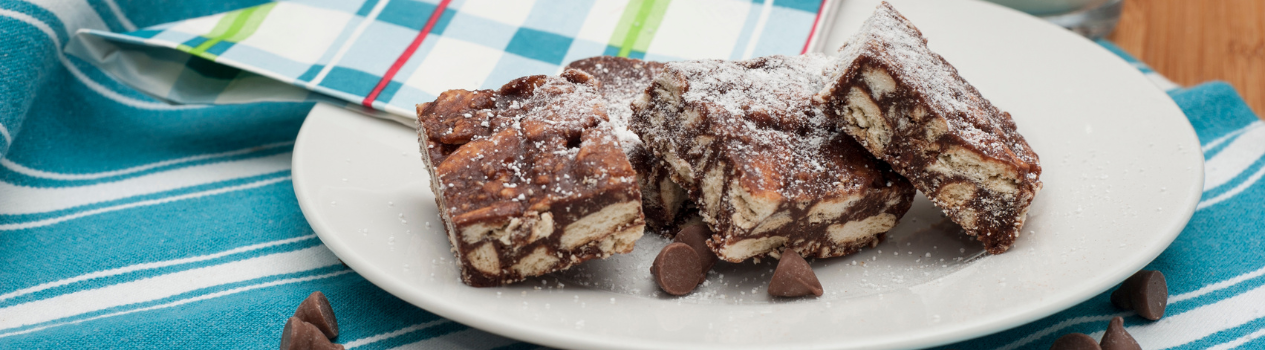
Having that sudden craving for chocolate? Kek batik is the answer for you! It’s quick, It’s easy, it satisfies every craving of yours! Our Kek Batik recipe (resepi kek batik) gives you easy steps to cook this awesome cake. The beauty of kek batik is its fudgy texture that requires no baking! Just a packet of Marie biscuits and a generous amount of chocolate sauce and voila!